Open XenApp 6.5 setup folder >select Auto-run press enter
Using this blog i have tried to provide simple steps for installation and configuration .Your comment will provide me motivation for writing more.
Citrix XenApp 6.5 Installation and configuration step by step
 SME VMware and Window | VMware | VxRail | vSAN | SRM | vRO | vROP|VMware Aria Log Insight| Nutanix |Cisco HyperFlex | NetApp | Azure | Citrix | Veeam Backup & Replication, EM & One
Manually upgrade ESXI host
ESXi hosts can be updated manually downloading the patch ZIP file from the VMware download page and installing the VIB by using the esxcli software vib command. Additionally, the system can be updated using the image profile and the esxcli software profile command
Before up-gradation we can
take ESXI host backup
First install VMware PowerCli
Connect your ESXI or vCenter with powercli
Connect-VIServer IP “VC or ESXI IP”
Create one folder in destination drive.
D:\Backup
Set-VMHost -VMHost ESXi_host_IP_address -State 'Maintenance'
How to restore VMware configuration
Before restore the ESXI configuration place your ESXI host
into maintenance mode
Set-VMHost -VMHost ESXi_host_IP_address -State 'Maintenance'
Download patch from below
link-:
https://my.vmware.com/group/vmware/patch#search
Place downloaded file into
local Datastore on ESXI host
Migrate all VMs to running
ESXI host
Place ESXI host into
maintenance mode using below command
vim-cmd hostsvc/maintenance_mode_enter
Command need to Run to
update new patch level.
esxcli software vib update –d /vmfs/volumes/5d1af13d-5309ef01-05a3-000c29ac6ffb/ESXi650-201710001.zip
Reboot the ESXI host
Now remove from maintenance mode
vim-cmd hostsvc/maintenance_mode_exit
 SME VMware and Window | VMware | VxRail | vSAN | SRM | vRO | vROP|VMware Aria Log Insight| Nutanix |Cisco HyperFlex | NetApp | Azure | Citrix | Veeam Backup & Replication, EM & One
Create Microsoft Cluster in ESXI using RDM disk
To create MS cluster in ESXI host below should be minimum requirements-:
1 . There should be two virtual Machines
2. At least 1 shared disk should be attached between both virtual machines
3. There should be 2 NICs 1 for production and another for heartbeat
4. RDM disk should attached for share disk
5. Should have Domain environment
6. User ID should have enough privilege to create cluster
7. Two free IP for production environment and two free IP for heartbeat (Heartbeat IP should be from different subnet)
Here I am covering only ESXI configuration part for cluster creation.
I have provisioned 2
VMS PRD1 and DEV1 for shared RDM and MS cluster
Initial HW configuration PRD1
Initial HW configuration DEV1
Select PRD1 VM -> Right click -> Go to Edit
Click on add device -> Select RDM Disk ->
Select LUN number shared by Storage team.
Initial configuration of new attached RDM
Change sharing option from unspecified to multi-Writer and Save
Validate configuration
Now note
Disk file-: [Shared_data]
PRD1/PRD1_2.vmdk
Virtual Device Node-:
SCSI controller 0 SCSI 0:3
Now go passive node DEV1-> Right click-> Edit
Select existing Hard Disk
Browse Datastore
Now
select the existing storage where RDM disk file is existing and select .VMDK
file
Now change Sharing mode from unspecified to Multi-writer
Now power ON both node one by one.
Login to the server-> Open computer management-> Disk management-> Select new attached disk and initialize
Right click and create new volume -> Give Name
Login to another server DEV1 and go to computer management -> Disk management -> Right click on new detected disk and initialize
Now you will see same RDM disk is visible in both nodes PRD1 and DEV1
Now you need attach two NICs in both VMs and install Microsoft Cluster Manager role and continue with configuration....
 SME VMware and Window | VMware | VxRail | vSAN | SRM | vRO | vROP|VMware Aria Log Insight| Nutanix |Cisco HyperFlex | NetApp | Azure | Citrix | Veeam Backup & Replication, EM & One
ESXI configuration backup -:
First install VMware PowerCli
Connect your ESXI or vCenter with powercli
Connect-VIServer IP “VC or ESXI IP”
Create one folder in destination drive.
Set-VMHost -VMHost ESXi_host_IP_address -State 'Maintenance'
How to restore VMware configuration
Before restore the ESXI configuration place your ESXI host
into maintenance mode
Set-VMHost -VMHost ESXi_host_IP_address -State 'Maintenance'
Run below command to restore configuration..
Set-VMHostFirmware -VMHost 192.168.1.13 -Restore -SourcePath D:\Backup\
configBundle-192.168.1.13.tgz
Once you will enter above command and press enter it will ask for user ID and password like below.
Set-VMHostFirmware -VMHost 192.168.1.13 -Restore -SourcePath D:\Backup\
configBundle-192.168.1.13.tgz
-HostUser root -HostPassword 123qwe=
vicfg-cfgbackup --server=192.168.1.13 --username=root -s
ESXi_test1_backup.tgz
 SME VMware and Window | VMware | VxRail | vSAN | SRM | vRO | vROP|VMware Aria Log Insight| Nutanix |Cisco HyperFlex | NetApp | Azure | Citrix | Veeam Backup & Replication, EM & One
ESXI host connect with Vcenter server step by step 6.0
Here I am going to share some steps that will be required during ESXI host add in Vcenter 6.0.
I have one Vcenter server with pre-installed application
IP Address:- 192.168.10.20
HostName :- 1-vsp.adds.com
Two ESXI host pre-installed ESXI on both node
IP Address:- 192.168.10.10
IP Address:- 192.168.10.11
One Domain server with server 2012 R2:-
IP Address:- 192.168.10.12
Host Name:- adds.com
One Client with Server 2012 R2:-
IP Address:- 192.168.10.13
Host Name:- Clent1.adds.com
On client machine you need to first install Vcenter client setup file using setup file.
1. Once the setup will install one shortcut key will appear on the desktop
2. Double click and open it and enter Vcenter server host IP, User ID and password as below and click on login.
3. When you will click on login next page will be as below.
4. Click on Host and cluster.
5. Select Vcenter server Name and Right click and select new Data canter
6. Now click on Add host
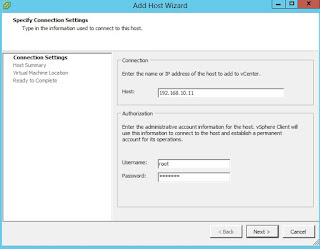
7. Enter ESXI Host IP ESXI User ID and password as below

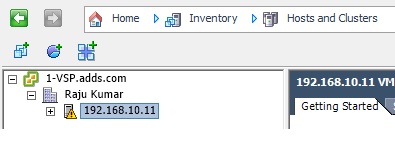
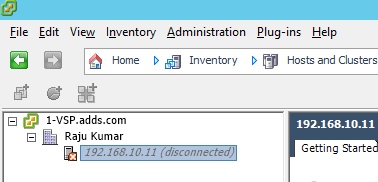
14. You can see the recent task here ESXI is getting attach with ESXI host.

 SME VMware and Window | VMware | VxRail | vSAN | SRM | vRO | vROP|VMware Aria Log Insight| Nutanix |Cisco HyperFlex | NetApp | Azure | Citrix | Veeam Backup & Replication, EM & One
XenApp 6.5 Installation and Configuration Step by Step
 SME VMware and Window | VMware | VxRail | vSAN | SRM | vRO | vROP|VMware Aria Log Insight| Nutanix |Cisco HyperFlex | NetApp | Azure | Citrix | Veeam Backup & Replication, EM & One
Featured Post
HPE MSA 2040 configuration step by step
HPE MSA 2040 configuration Default IP range for HP SAN storage MSA 2040 is 10.0.0.1/2 You need to connect your laptop and storage with...

-
HPE MSA 2040 configuration Default IP range for HP SAN storage MSA 2040 is 10.0.0.1/2 You need to connect your laptop and storage with...
-
When you are powering on the VM and getting below error what do you need to do? Error code Module ‘Monitorloop’ power on failed Failed to ...
-
CRITICAL: This node is not healthy because the root volume is low on space (<10MB). The node can still serve data, but it cannot part...
-
Hi Friends, Here I am going to share some steps that will be required during ESXI host add in Vcenter 6.0. I have one Vcenter server wi...
-
Command to check vpxa, hostd service status | start stop the vpxa & hostd service Login to ESXi host using putty session Go to /etc/in...
-
X enApp 6.5 Installation and Configuration Steps
-
Citrix PVS Reverse Imaging We do reverse imaging when you want to update vDisk, VMTool, OS or drivers. To update Citrix target devices it...
-
Different ways for certification authority backup https://blog.ahasayen.com/certification-authority-backup/ Upgrading / Migra...
-
You can upgrade using VUM, ISO or ESXCLI Here I am going to do this using ESXCLI I am using HPE custom ISO, you can download an offline bund...
-
If you see EDGE node registration in pending state like below Run below command on NSX-T manager to get thumbprint get certificate api th...


