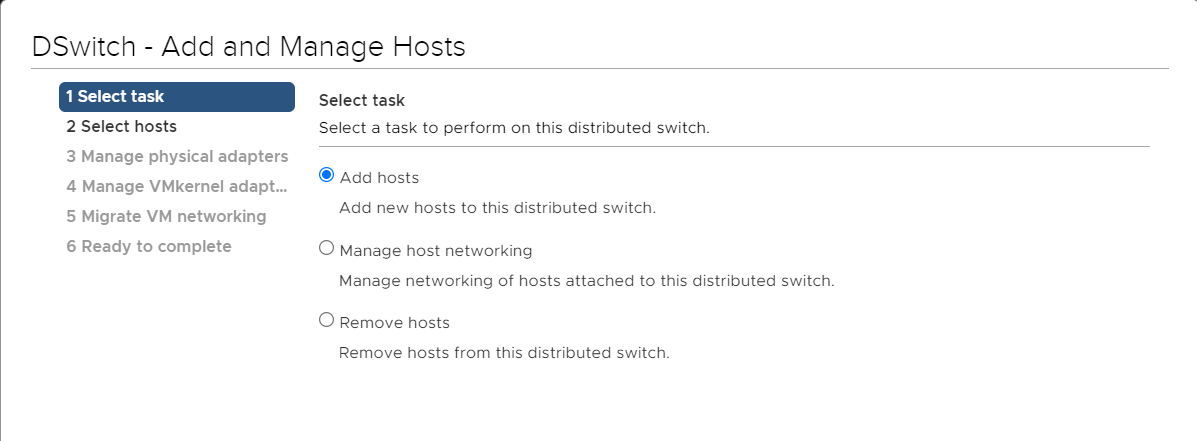
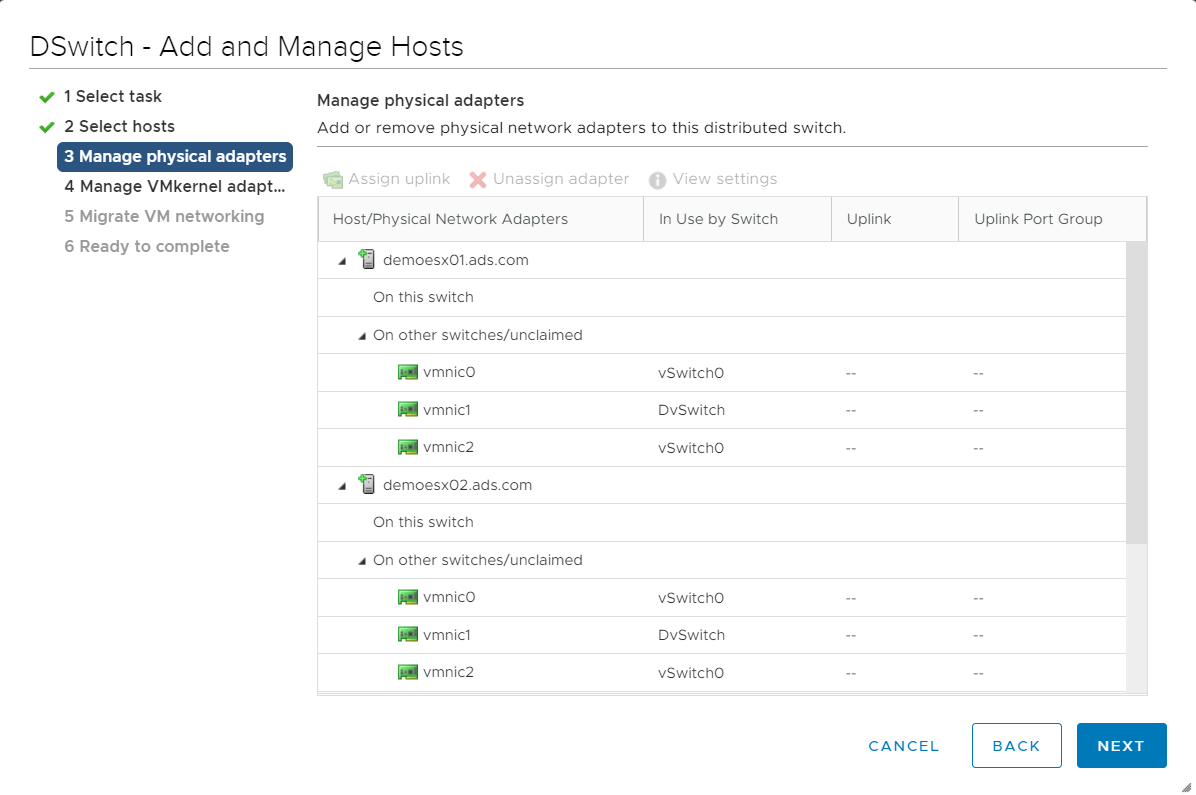
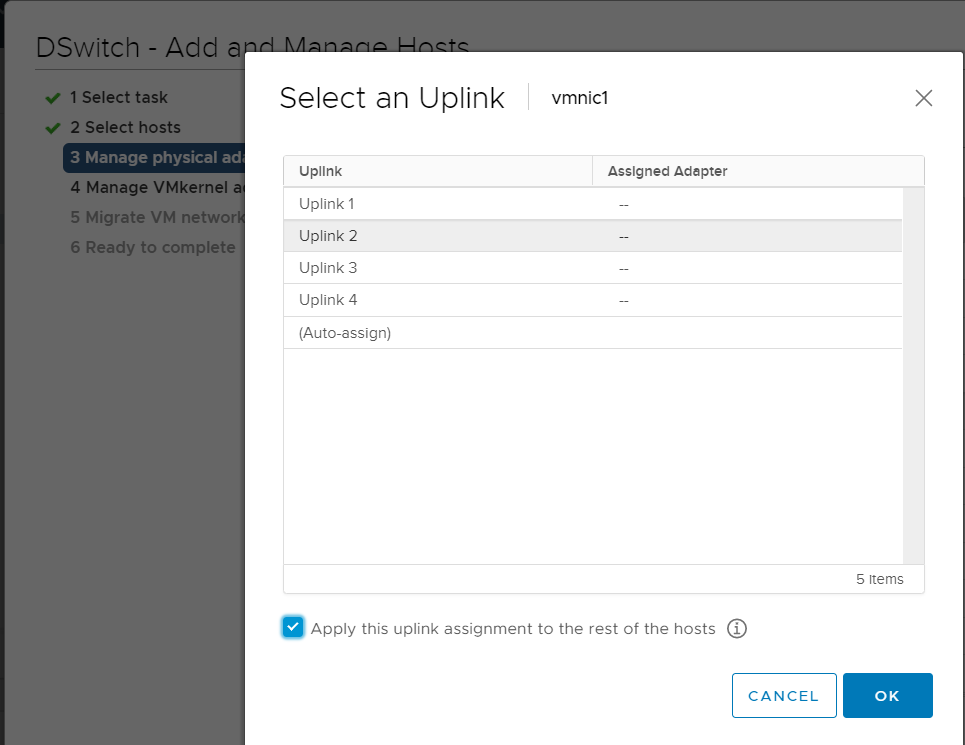
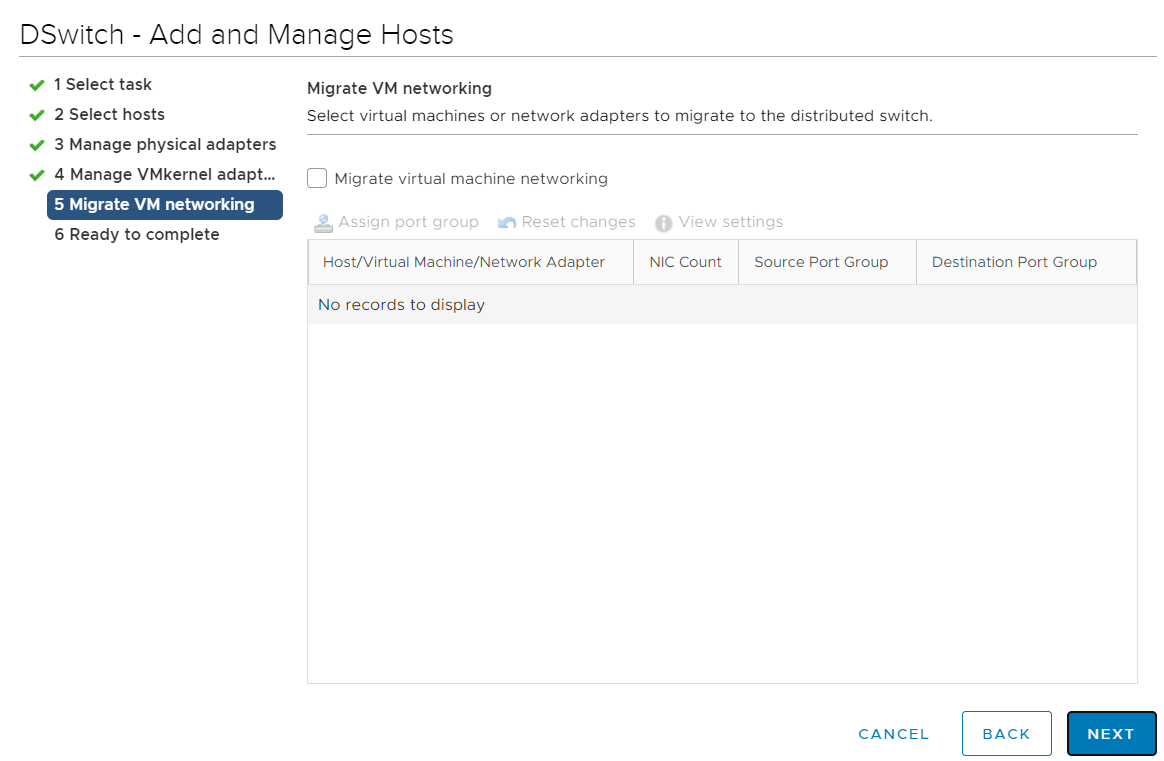
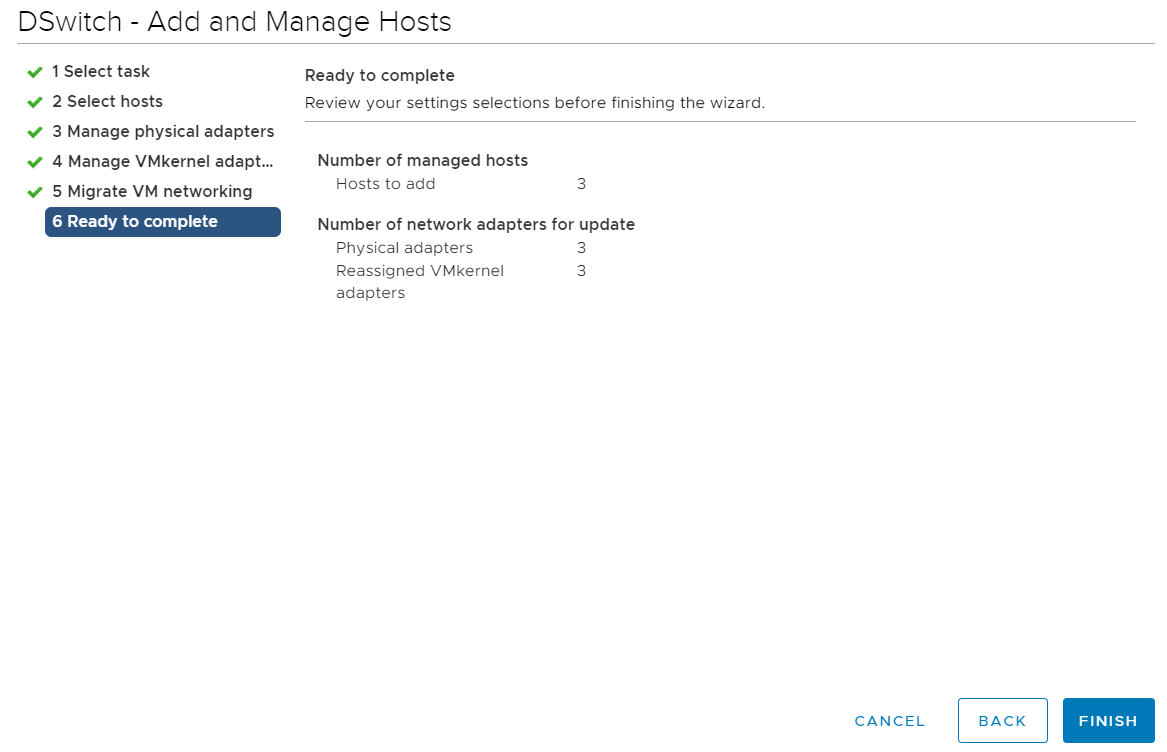
Steps to Add or Manage ESXi host with Distributed switch in vCenter server 7.0


 SME VMware and Window | VMware | VxRail | vSAN | SRM | vRO | vROP|VMware Aria Log Insight| Nutanix |Cisco HyperFlex | NetApp | Azure | Citrix | Veeam Backup & Replication, EM & One
Steps to create Distributed switch and port in vCenter server 7.0
Steps to create Distributed switch and port in vCenter server 7.0
Login to vCenter server
Select Datacenter Name and right click -> Select Distributed Switch
Select new Distributed switch

Give distributed switch Name & Click next

Select ESXi version, in my case I am selecting higher version

Specify number of uplinks
Check mark to create a default port group
Give port group name: MGMT

Click next

Click Finish
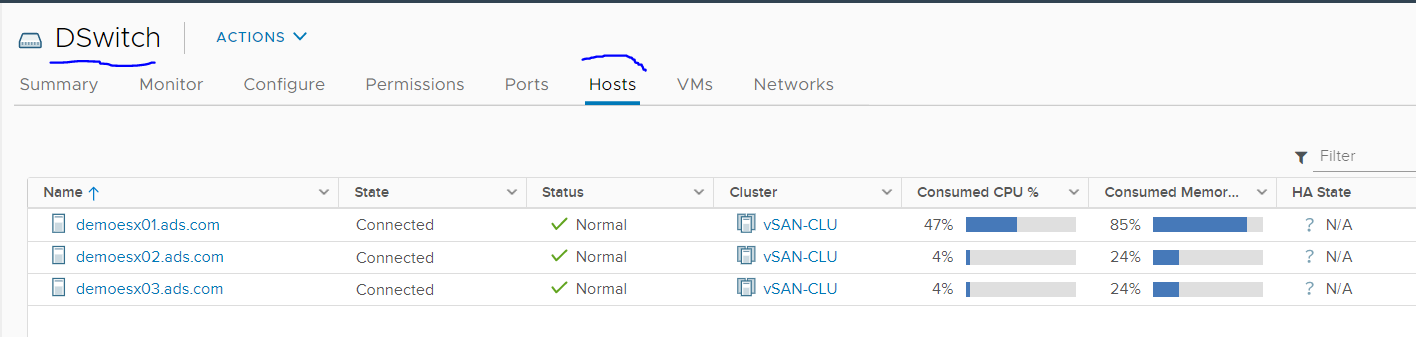
Now a Distributed switch has created.

To create additional port group
Select Distributed Switch -> Right click and select Distributed port group
Select new distributed port group

Give port group name

Modify the changes as per your requirements
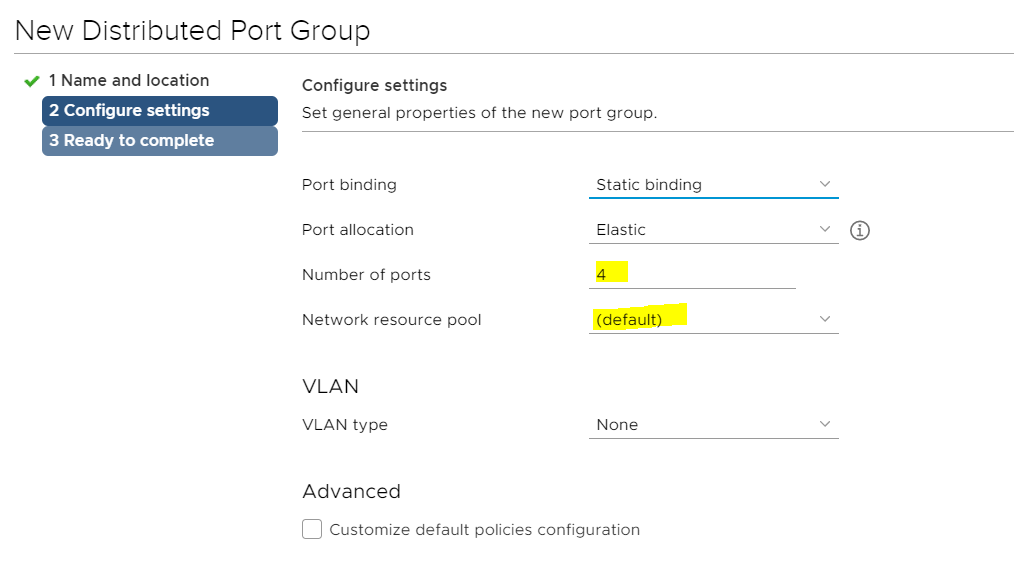
Click next and finish
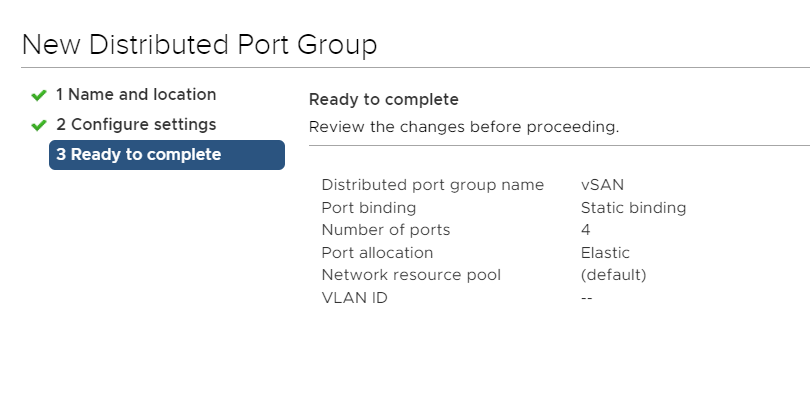
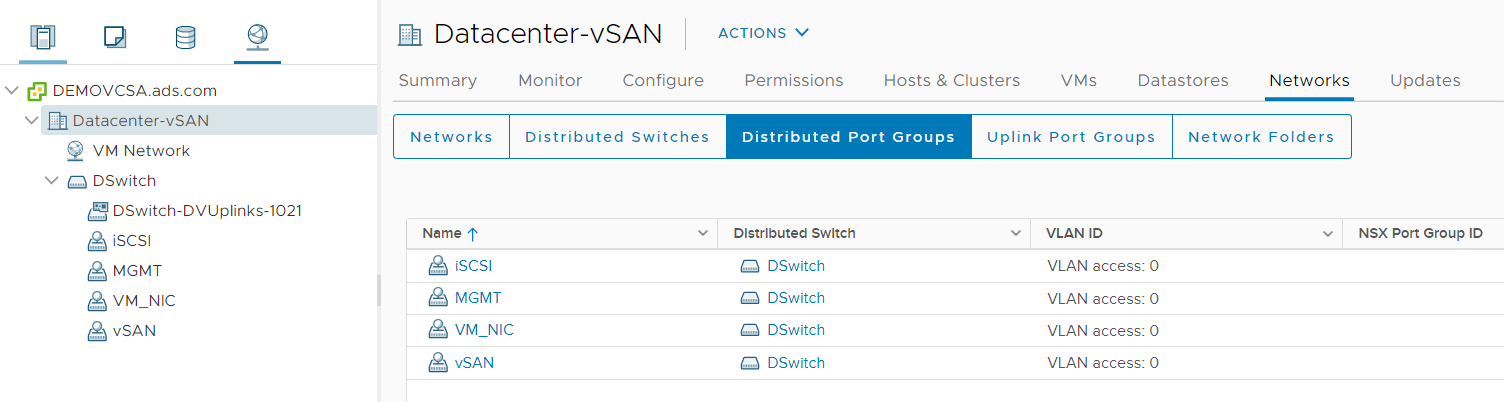
Now I have created 4 port groups as per my requirements.
 SME VMware and Window | VMware | VxRail | vSAN | SRM | vRO | vROP|VMware Aria Log Insight| Nutanix |Cisco HyperFlex | NetApp | Azure | Citrix | Veeam Backup & Replication, EM & One
Create Delivery group in Citrix 7.9 Step by Step
Create Delivery group in Citrix 7.9 Step by Step
To create a Delivery Group we need to first create a machine catalog and before creating a machine catalog we need to deploy machines.
Login to DDC server
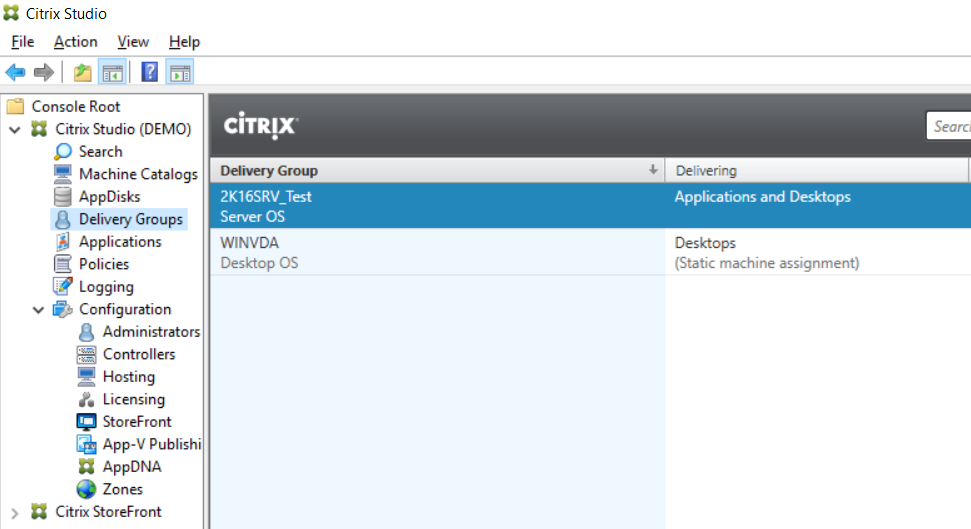
Open Citrix Studio -> Select Delivery Group
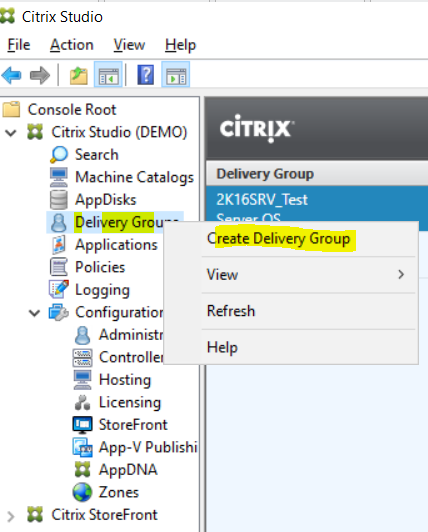
Right click on Delivery Group -> Create Delivery group
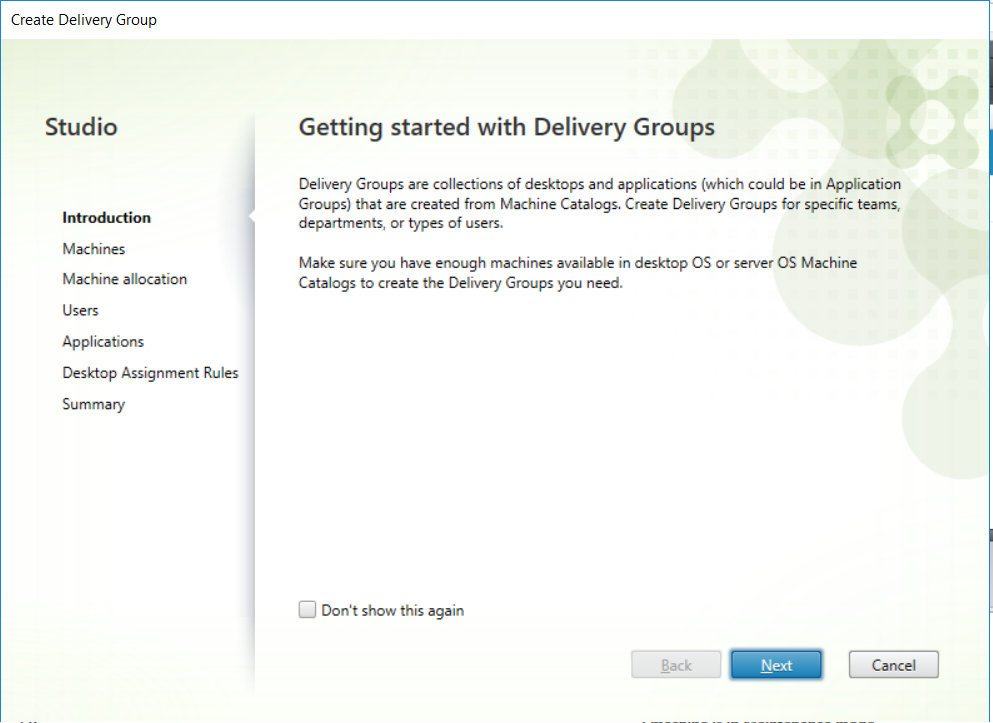
Click Next
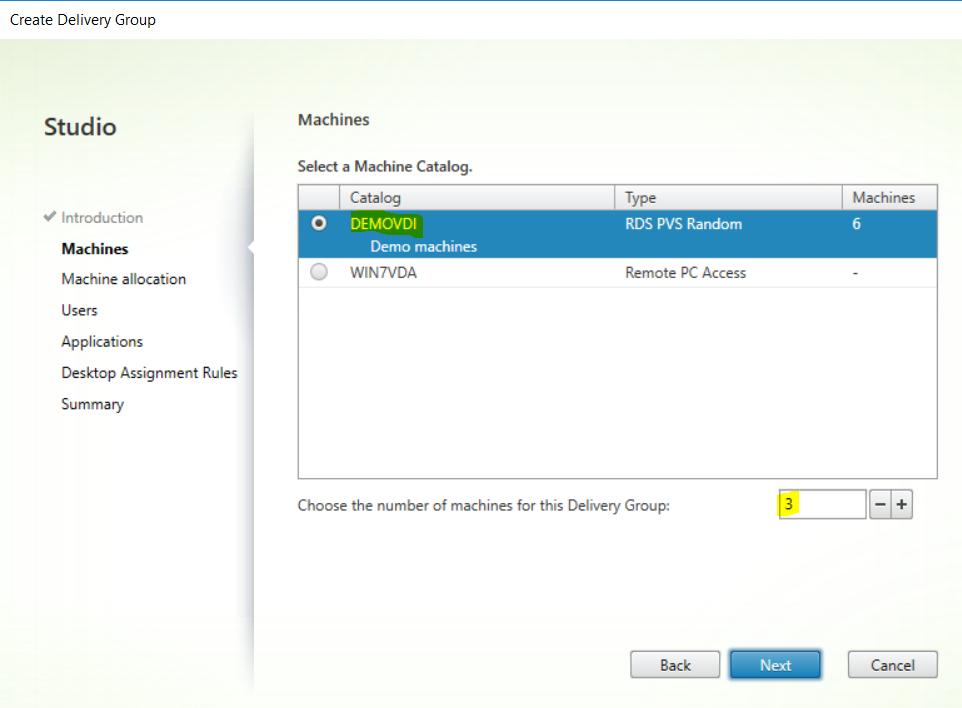
Select the machine catalog that you want to assign in delivery group
In my case I am selecting DEMOVDI that I created recently.
Choose the number of machines for this Delivery group
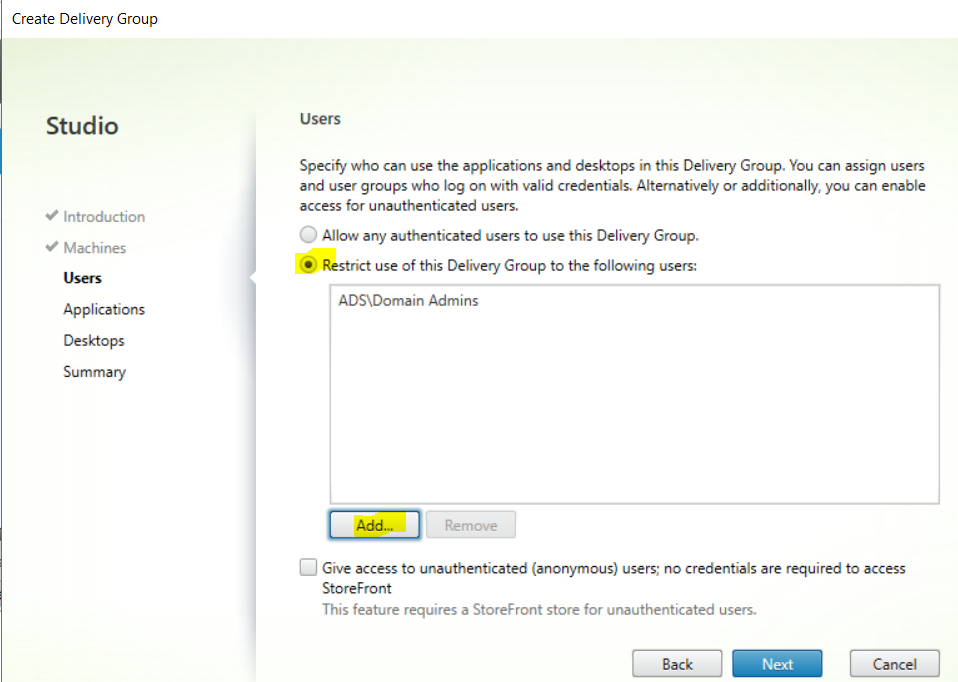
Add Users or group names here to whom you want to allow access.
As I am doing for testing purpose so selecting here Domain admins
If you want to publish an application from here, Click Add and publish application as well but in my case I am not publishing application from here.
Click next.

Click next
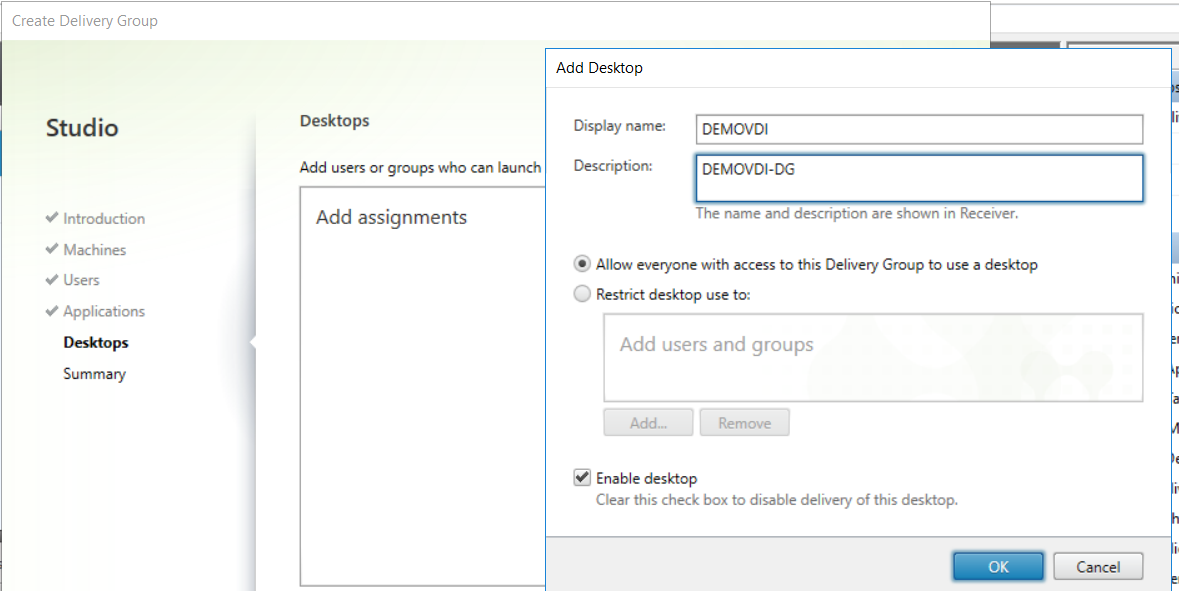
Enter Display name that will show when you will launch Citrix storefront web console
Check mark on Enable desktop.
Click next
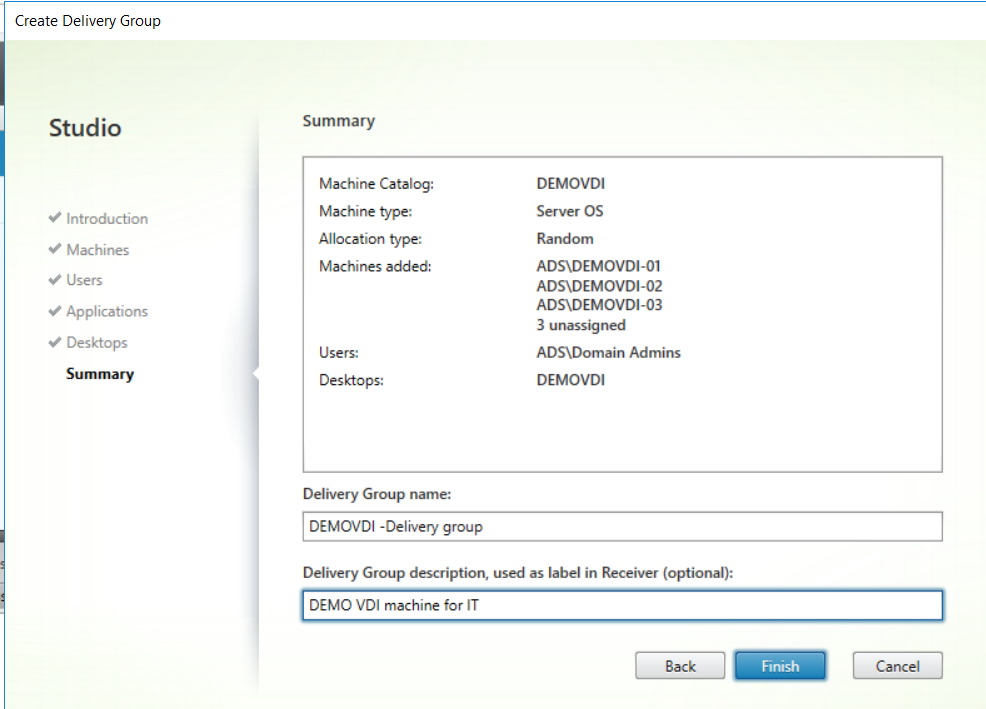
Enter delivery group name
Click finish
Now newly delivery group has been created.

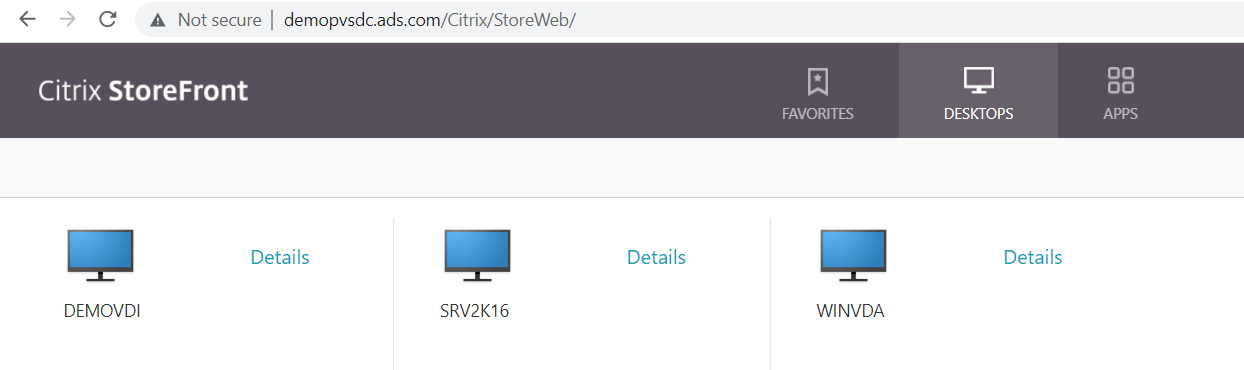
Now launch Citrix StoreFront and login with user ID & Password
http://demopvsdc.ads.com/Citrix/StoreWeb/
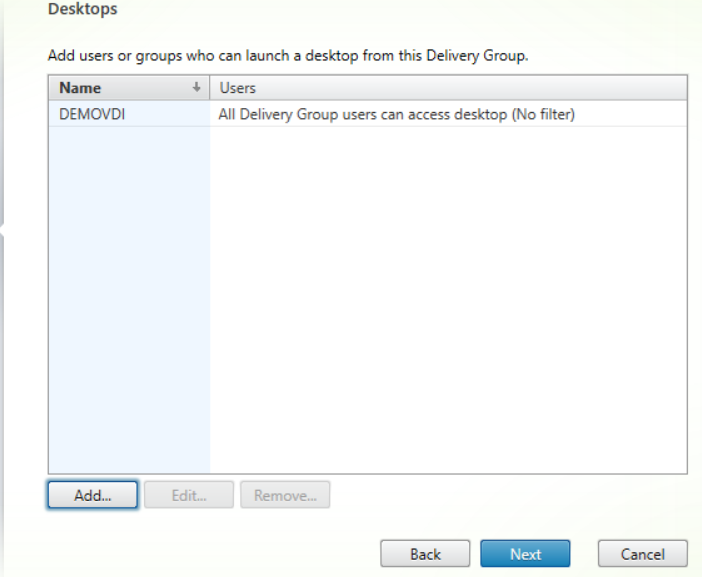
Newly created Delivery group DEMOVDI is showing here.
 SME VMware and Window | VMware | VxRail | vSAN | SRM | vRO | vROP|VMware Aria Log Insight| Nutanix |Cisco HyperFlex | NetApp | Azure | Citrix | Veeam Backup & Replication, EM & One
Create Machine catalog in Citrix Studio 7.9 step by step
Create Machine catalog in Citrix Studio 7.9 step by step
Login to DDC server where you have installed Citrix Studio
Open Citrix Studio console

Right click on Machine Catalogs -> Select Create Machine Catalog


Click Next
Select Operating system types (In my case I am creating for server OS)

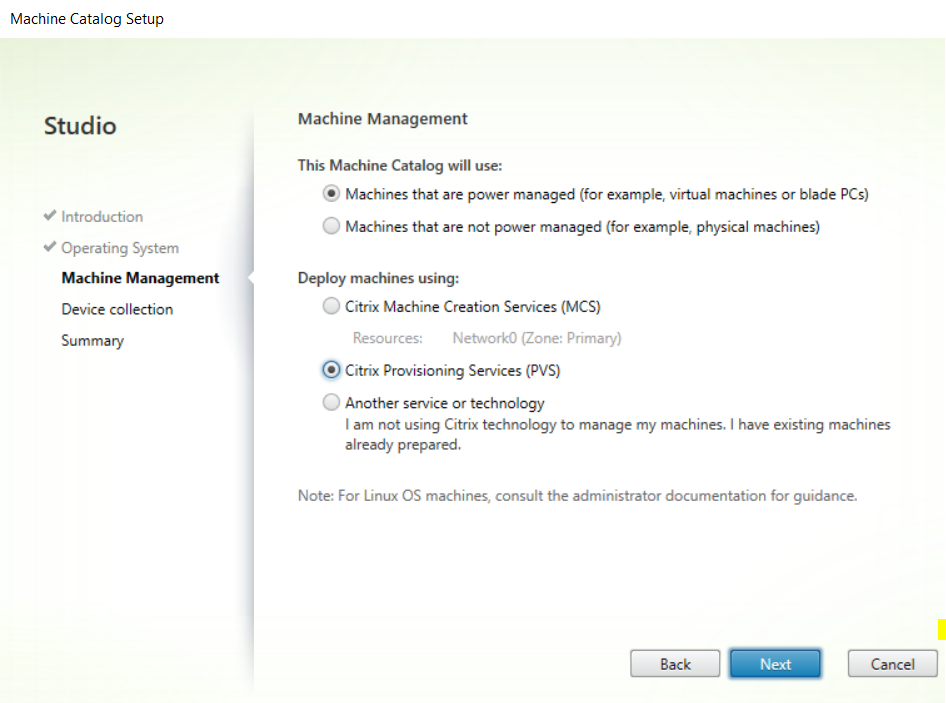
Select Machine Management for VM select Power managed
Deployment type – in my case I am using PVS based
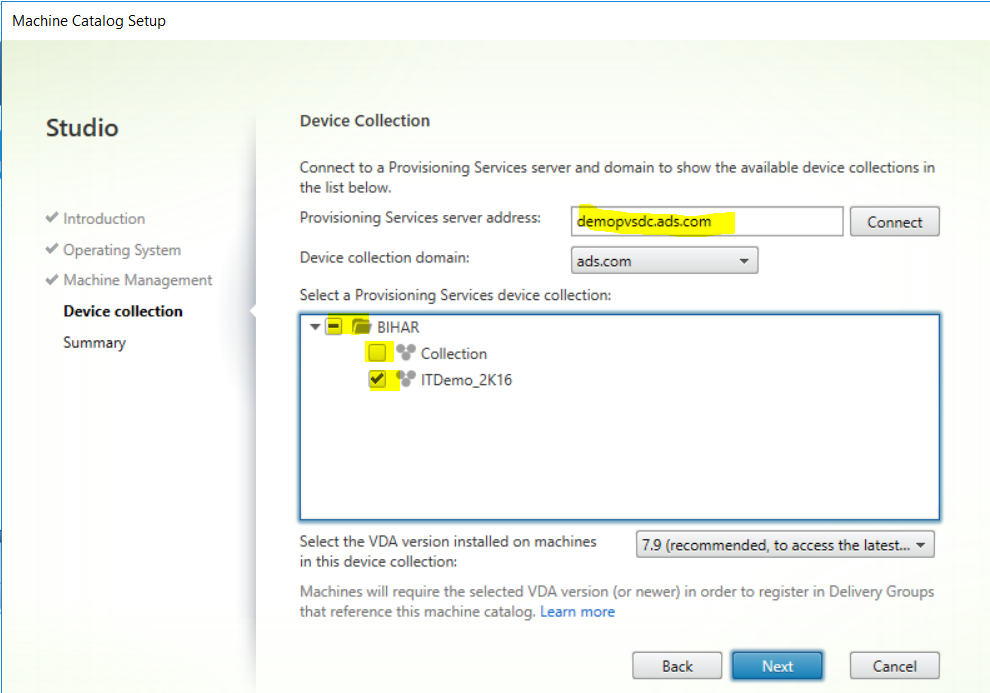
Enter PVS Name
Expend Site and select collection that you want to publish.
Click Next
Enter Machine catalog name
Enter machine catalog description

Click Finish

New Machine catalog has created.
Now all 6 machines are showing that is available in that device collection.

PVS Device collection

Next steps will be create delivery group
http://www.mytechinfoit.com/2021/12/citrix-provisioning-2109-installation.html
http://www.mytechinfoit.com/2021/12/how-to-create-bulk-machines-in-citrix.html
SME VMware and Window | VMware | VxRail | vSAN | SRM | vRO | vROP|VMware Aria Log Insight| Nutanix |Cisco HyperFlex | NetApp | Azure | Citrix | Veeam Backup & Replication, EM & One
How to create bulk Machines in Citrix PVS using streamed VM setup wizard
How to create bulk Machines in Citrix PVS using streamed VM setup wizard
First of all you need to prepare one machine using all the prerequisite software and install Citrix provisioning target device software and export image and create vDisk
You can follow below link for Citrix target device software installation and image export.
http://www.mytechinfoit.com/2021/12/citrix-provisioning-2109-installation.html
Now convert one VM to template in XenServer.
Now login to Citrix PVS server
Open Citrix provisioning console

Make sure you have already added Hypervisor host
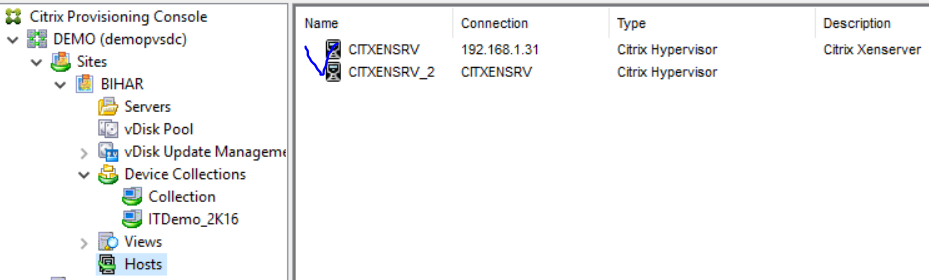
Now right click on Site (In my case Bihar is my PVS site)
And click streamed VM setup wizard.

Click next

Enter Citrix Hypervisor Name
Username
Password
Port 80

Click Next
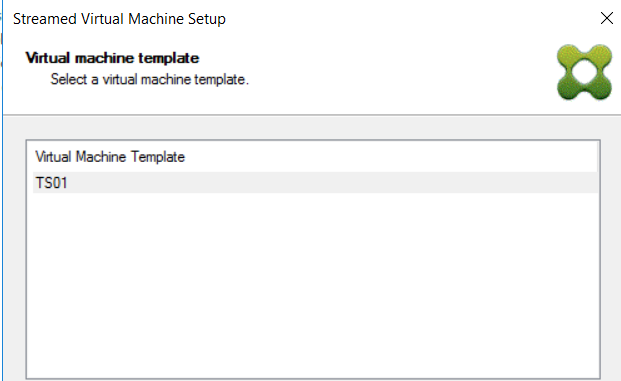
It will detect Virtual Machine template from XenServer
Click next
Select vDisk that you create during image export.

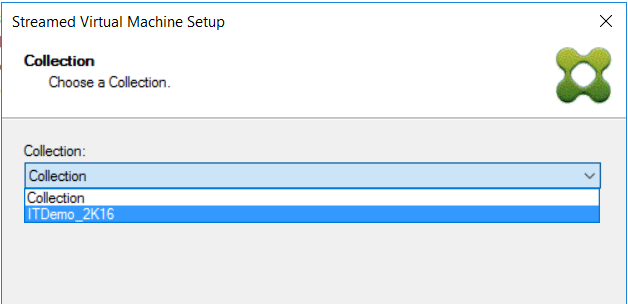
Drop down and select the collection where you want to create these VMs
Give VM number:-4
Assign vCPUs: - 2
Assign memory:-2048

Click next
Select Computer account option like create new or import
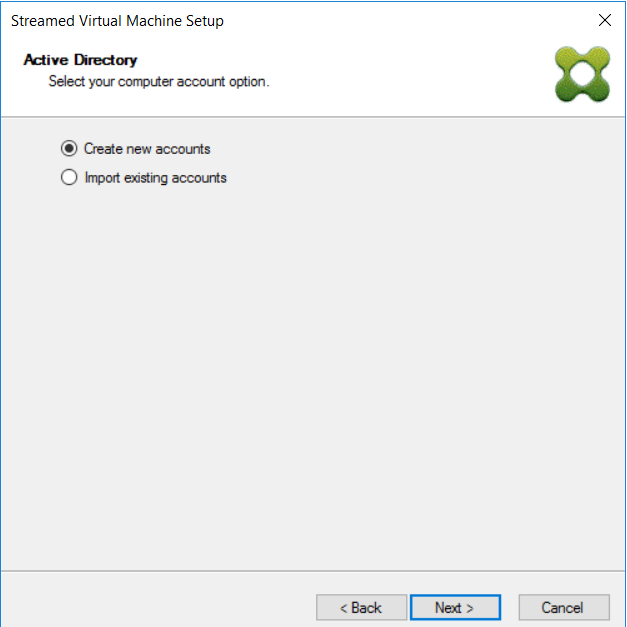
Dropdown and select domain: - ads.com
Select OU
Give account naming schema ## is number start from 0

Click next
Click finish
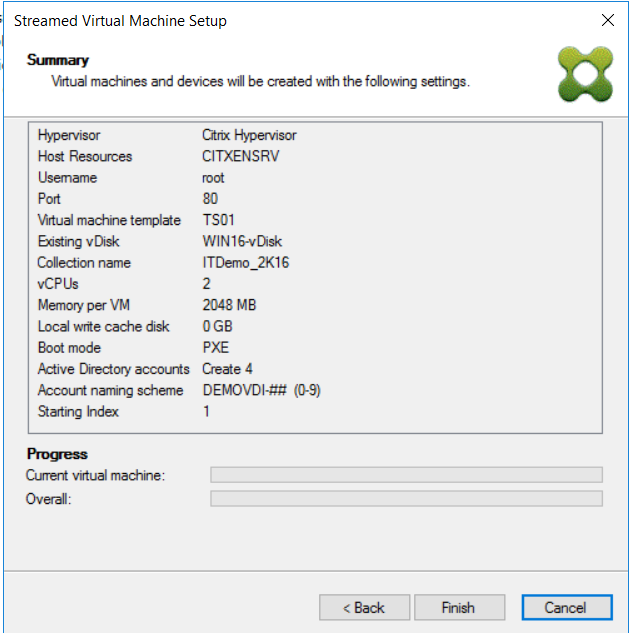
Now all 4 devices have created.
Click done

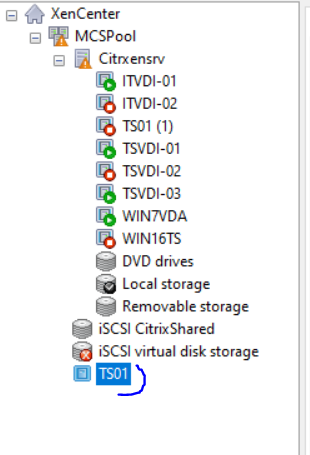
Now go to device collection -> ITDemo_2K16 and you will see newly created VMs
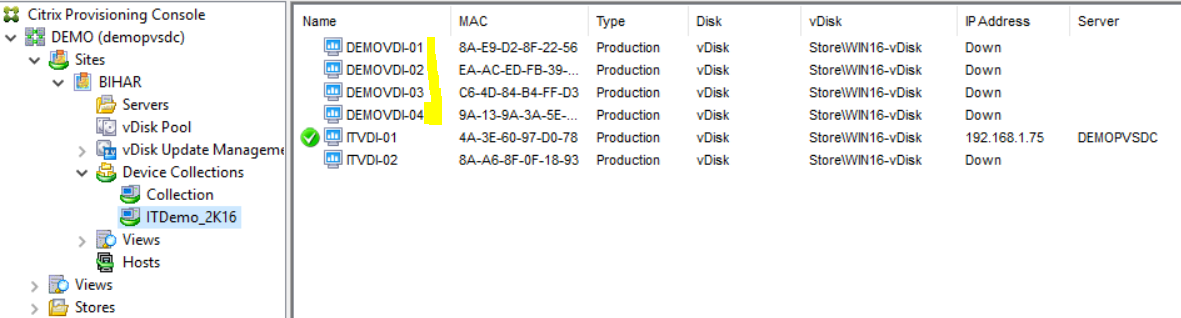
Also go to XenCenter and you will see all newly created VMs.

Now you can power it on publish on Citrix..
I will cover it in next document.
SME VMware and Window | VMware | VxRail | vSAN | SRM | vRO | vROP|VMware Aria Log Insight| Nutanix |Cisco HyperFlex | NetApp | Azure | Citrix | Veeam Backup & Replication, EM & One
Subscribe to:
Posts (Atom)
Featured Post
HPE MSA 2040 configuration step by step
HPE MSA 2040 configuration Default IP range for HP SAN storage MSA 2040 is 10.0.0.1/2 You need to connect your laptop and storage with...

-
 HPE MSA 2040 configuration Default IP range for HP SAN storage MSA 2040 is 10.0.0.1/2 You need to connect your laptop and storage with...
 -
When you are powering on the VM and getting below error what do you need to do? Error code Module ‘Monitorloop’ power on failed Failed to ...
-
 CRITICAL: This node is not healthy because the root volume is low on space (<10MB). The node can still serve data, but it cannot part...
 -
 Hi Friends, Here I am going to share some steps that will be required during ESXI host add in Vcenter 6.0. I have one Vcenter server wi...
 -
Command to check vpxa, hostd service status | start stop the vpxa & hostd service Login to ESXi host using putty session Go to /etc/in...
-
X enApp 6.5 Installation and Configuration Steps
-
Citrix PVS Reverse Imaging We do reverse imaging when you want to update vDisk, VMTool, OS or drivers. To update Citrix target devices it...
-
Different ways for certification authority backup https://blog.ahasayen.com/certification-authority-backup/ Upgrading / Migra...
-
You can upgrade using VUM, ISO or ESXCLI Here I am going to do this using ESXCLI I am using HPE custom ISO, you can download an offline bund...
-
If you see EDGE node registration in pending state like below Run below command on NSX-T manager to get thumbprint get certificate api th...


