Manually upgrade ESXI host

ESXi hosts can be updated  manually downloading the patch ZIP file from the VMware download page and installing the VIB by using the esxcli software vib command. Additionally, the system can be updated using the image profile and the esxcli software profile command

Before up-gradation we can take ESXI host backup

First install VMware PowerCli

Connect your ESXI or vCenter with powercli

Connect-VIServer IP “VC or ESXI IP”

Create one folder in destination drive.

D:\Backup


Set-VMHost -VMHost ESXi_host_IP_address -State 'Maintenance'

How to restore VMware configuration

Before restore the ESXI configuration place your ESXI host into maintenance mode

Set-VMHost -VMHost ESXi_host_IP_address -State 'Maintenance'


Download patch from below link-:

https://my.vmware.com/group/vmware/patch#search

Place downloaded file into local Datastore on ESXI host

Migrate all VMs to running ESXI host

Place ESXI host into maintenance mode using below command

vim-cmd hostsvc/maintenance_mode_enter

Command need to Run to update new patch level.

esxcli software vib update –d /vmfs/volumes/5d1af13d-5309ef01-05a3-000c29ac6ffb/ESXi650-201710001.zip

Reboot the ESXI host

Now remove from maintenance mode

vim-cmd hostsvc/maintenance_mode_exit


Create Microsoft Cluster in ESXI using RDM disk

 To create MS cluster in ESXI host below should be minimum requirements-: 

1 . There should be two virtual Machines

2. At least 1 shared disk should be attached between both virtual machines

3. There should be 2 NICs 1 for production and another for heartbeat

4. RDM disk should attached for share disk

5. Should have Domain environment 

6. User ID should have enough privilege to create cluster 

7. Two free IP for production environment and two free IP for heartbeat (Heartbeat IP should be from different subnet)

Here I am covering only ESXI configuration part for cluster creation.


I have provisioned 2 VMS PRD1 and DEV1 for shared RDM and MS cluster

Initial HW configuration PRD1

Initial HW configuration DEV1

Select PRD1 VM -> Right click -> Go to Edit

Click on add device -> Select RDM Disk -> 

Select LUN number shared by Storage team.

Initial configuration of new attached RDM

Change sharing option from unspecified to multi-Writer and Save

Validate configuration

Now note

Disk file-:  [Shared_data] PRD1/PRD1_2.vmdk

Virtual Device Node-:  SCSI controller 0 SCSI 0:3

Now go passive node DEV1-> Right click-> Edit

Select existing Hard Disk

Browse Datastore

Now select the existing storage where RDM disk file is existing and select .VMDK file

Now change Sharing mode from unspecified to Multi-writer

Now power ON both node one by one.

Login to the server-> Open computer management-> Disk management-> Select new attached disk and initialize

Right click and create new volume -> Give Name

Login to another server DEV1 and go to computer management -> Disk management -> Right click on new detected disk and initialize


Now you will see same RDM disk is visible in both nodes PRD1 and DEV1


Now you need attach two NICs in both VMs and install Microsoft Cluster Manager role and continue with configuration....


ESXI configuration backup -:

First install VMware PowerCli

Connect your ESXI or vCenter with powercli

Connect-VIServer IP “VC or ESXI IP”

Create one folder in destination drive.


Set-VMHost -VMHost ESXi_host_IP_address -State 'Maintenance'


How to restore VMware configuration

Before restore the ESXI configuration place your ESXI host into maintenance mode

Set-VMHost -VMHost ESXi_host_IP_address -State 'Maintenance'

Run below command to restore configuration..

Set-VMHostFirmware -VMHost 192.168.1.13 -Restore -SourcePath D:\Backup\ configBundle-192.168.1.13.tgz


Once you will enter above command and press enter it will ask for user ID and password like below.

Set-VMHostFirmware -VMHost 192.168.1.13 -Restore -SourcePath D:\Backup\ configBundle-192.168.1.13.tgz -HostUser root -HostPassword 123qwe=


vicfg-cfgbackup --server=192.168.1.13 --username=root -s ESXi_test1_backup.tgz


ESXI host connect with Vcenter server step by step 6.0

Hi Friends,

Here I am going to share some steps that will be required during ESXI host add in Vcenter 6.0.

I have one Vcenter server with pre-installed application

IP Address:-  192.168.10.20
HostName :-  1-vsp.adds.com

Two ESXI host pre-installed ESXI on both node

IP Address:-  192.168.10.10
IP Address:-  192.168.10.11

One Domain server with server 2012 R2:-

IP Address:- 192.168.10.12
Host Name:- adds.com

One Client with Server 2012 R2:-

IP Address:-  192.168.10.13
Host Name:- Clent1.adds.com

On client machine you need to first install Vcenter client setup file using setup file.

1. Once the setup will install one shortcut key will appear on the desktop
2. Double click and open it and enter Vcenter server host IP, User ID and password as below and click on login.

3. When you will click on login next page will be as below.


4. Click on Host and cluster.

5. Select Vcenter server Name and Right click and select new Data canter


6. Now click on Add host

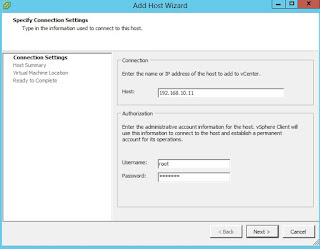
7. Enter ESXI Host IP ESXI User ID and password as below


9. Click Yes button
10. Click next button here Virtual machine is showing because I have already created in ESXI host


11. Enter license key or select evaluation version

12. Click on Enable Lockdown Mode if you want your ESXI to lock.


13. Click twice next and finish
 

14. You can see the recent task here ESXI is getting attach with ESXI host.
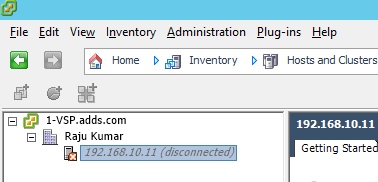
15. ESXI status showing disconnected because process is on going
16. Now configuration has completed 100 %

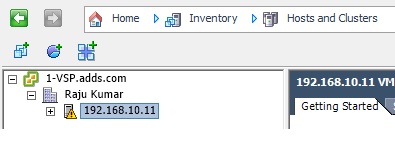
17. Now ESXI host connection is showing connected after 100 % task completion


18. Above are the VM list i.e Cloned VM, Test VM and Win 7


XenApp 6.5 Installation and Configuration Step by Step

XenApp 6.5 Installation and Configuration Steps

HPE MSA 2040 configuration step by step

HPE MSA 2040 configuration

Default IP range for HP SAN storage MSA 2040 is 10.0.0.1/2

You need to connect your laptop and storage with cross cabling and assign the same range IP address.

1-: Now in your system browser type


And press enter 


Enter User Name -: manage
Enter password -: !manage
(These ID and password is default for these series of storage)


Now click on Home for check your Fibber cable connection,  which port is active.

HOW to Configure RAID 5 ON storage-:

1-: Click on Home button > Action>select Configuration


3-:  Assign Time & Date manually or define through NTP server.


4-: Enter here New password for Manage user or leave it default to avoid any password remember issue.


5-: Assign IP address manually or take it through DHCP.
You can use this IP address for access your storage through web link any you can manage it from any system.


6-:  Select from here Web browser settings.


7-: Configure from here Mail notification if you want to receive any auto generated mail but for this you should have SMTP service.

Click next


8-: Define from here your controller speed better to leave it at default settings.

Now Click next


9-: Click on finish


Click Yes

10-: Now you can see all HDD that you have connect in storage, In my storage I have installed 6 HDD that is showing here.


11-:  Configuration Settings
A-      In type select Virtual
B-      In Name  Assign your storage name
C-      In RAID level assign RAID (In my case I have select RAID 5)
D-     And select the all Six HDD and click on ADD


   Click OK

12-: Click on Host and you will see here all 4 unassigned drive


13-: Now click on pool and see the all HDD space, storage Name and Drive space


13-: MAP Volume with Host Name

First you need to select on Group name and after that you need to follow below step

A  Click on Host
B  Click on Action > Add Host


14-: Assign Host name and click ok


Click OK
15-: How to Remove Host Name
First you need to select a Group Name

A  Select Host and click on Action
B  Select Remove Host


16-: Click on Action > select Create Virtual Volume


17-: Assign the Volume Name and drive space


18-: Click on Add row for add multiple Volume at a same time


19-: How to delete Volume

A  First you need to select Volume Name that you want to delete.
B  Click on Action select Delete Volume


20-: How to MAP Volume
A:  Select Mapping
B:  Click on Action >MAP
Select Volume and Host Name on which you want to MAP
Click on MAP


Now Please check in your system Mapped volume will display in your system Disk management
Initially it will Display in Offline Mode but you need to bring it Online for this you need to just right click on Device and select Online.

Done with HPE MSA 2040 configuration.

Thanks Raju Prasad


Featured Post

HPE MSA 2040 configuration step by step

HPE MSA 2040 configuration Default IP range for HP SAN storage MSA 2040 is 10.0.0.1/2 You need to connect your laptop and storage with...