How to create Dashboard in VMware Aria Operation for log for Login and Logout user session

Login to VMWare Aria Operations for Logs

Click Explore Logs

Select time slot

Click ADD Filter


Display query as text -> Drop down and select event_type -> Contains -> Event ID (I have given both event id for session login and logout)


Click on the search box, now you will see the events generated for login and logout session, like below.


Now click on right side three dots ->Click Add to Dashboard


Now go to Dashboard you will see newly created Dashboard


Create Symptom Definition & Alert if Snapshot is older than XXX Days in VMware Aria Operation

A Symptom Definition allows the administrator to describe a situation that is NOT normal within a given environment. vROPs come pre-configured with many symptom definitions that are set to values which are a good starting point for “most” environments.

Create Symptom Definition & Alert if Snapshot is older than 60 Days VMware Aria/ vRealize Operation


Login to vROPS console

Under Configuration -> Alert -> Symptom Definitions


Click Add


Select Base object, Symptom type 


Now create Alert definition


Under Configure -> Alert -> Add -> Give Alert Definitions Name


Base Object Type-> Drop down vCenter -> Virtual Machine


Click Next


Select Symptoms


In filter Type Symptom Name that you have already created and want to integrate with Alert Definition –:  Drag and drop in Symptoms/Conditions


Next


Recommendation -> Select the recommendation 


Next -> Select Policies


Click Create


ESXI host connect with Vcenter server step by step 6.0

Steps to add ESXI host  in Vcenter 6.0.

I have one Vcenter server with pre-installed application

IP Address:-  192.168.10.20
HostName :-  1-vsp.adds.com

Two ESXI host pre-installed ESXI on both node

IP Address:-  192.168.10.10
IP Address:-  192.168.10.11

One Domain server with server 2012 R2:-

IP Address:- 192.168.10.12
Host Name:- adds.com

One Client with Server 2012 R2:-

IP Address:-  192.168.10.13
Host Name:- Clent1.adds.com


On client machine you need to first install Vcenter client setup file using setup file.

1. Once the setup will install one shortcut key will appear on the desktop
2. Double click and open it and enter Vcenter server host IP, User ID and password as below and click on login.

3. When you will click on login next page will be as below.


4. Click on Host and cluster.

5. Select Vcenter server Name and Right click and select new Data center


6. Now click on Add host

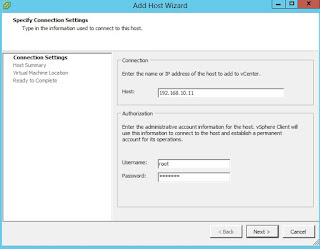
7. Enter ESXI Host IP ESXI User ID and password as below


9. Click Yes button
10. Click next button here Virtual machine is showing because I have already created in ESXI host


11. Enter license key or select evaluation version

12. Click on Enable Lockdown Mode if you want your ESXI to lock.


13. Click twice next and finish
 

14. You can see the recent task here ESXI is getting attach with ESXI host.
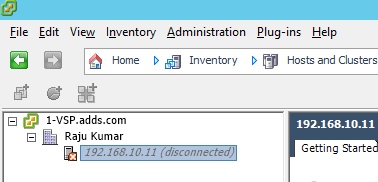
15. ESXI status showing disconnected because process is on going
16. Now configuration has completed 100 %

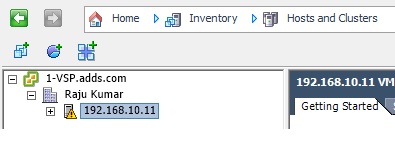
17. Now ESXI host connection is showing connected after 100 % task completion


18. Above are the VM list i.e Clonned VM, Test VM and Win 7


Office 365 Admin Console

Steps need to follow for Creation modification and deletion of Accounts.


Click on Admin to open Dashboard.


Click on Active Users for check users list or R.C here and select New user for create


Click on Group to add any user to this Group.

For check License click on Billing>License

Change or provide full access to User for create, Delete and modification.


VMware Scenario Based Question and Answer

  1.  Suppose If we have newly built ESXI host with 4 Physical NICs, all NICs are assigned to VSS MGMT kernel port port and we have to migrate MGMT kernel port group from VSS to vDS.

          what will be the steps that we need to follow?

Ans -> To migrate traffic from VSS port group to vDS port group there must be physical NIC assigned to Destination port group. So below steps need to follow.

            First need to remove 1 or 2 physical NICs from VSS Switch and make it free

           Assign free NICs to vDS switch and then start management traffic migration.


2.  Can we change Snapshot file location in VMWare? If yes, then how can we change?

Yes, 

3. How does HA keep track of which VM need to be restarted in case of an ESXI host failure?

Ans. HA takes help of two files namely power ON and protected list. The power ON file maintained by each ESXI host individually  and it contains entries of those VMs, which are currently running on that ESXI host.
The  protected list file in maintained at Datastore level and tells HA which VM was protected before failure. Based on these two file HA decide which VM need to restart In case of HA trigger.


   Host-<id>-poweron


NetApp MISC command line

 Connect NetApp cluster IP using Putty.


Enter user name and password


Use ? mark to see related command in NetApp


Script to create Multiple local Users and set Password never Expire

function create-account ([string]$accountName) {

 $hostname = hostname

 $comp = [adsi]"WinNT://$hostname"

 $user = $comp.Create("User", $accountName)

 $user.SetPassword("P@ssw0rd")

 #$user.SetInfo()

 $User.UserFlags[0] = $User.UserFlags[0] -bor 0x10000 #ADS_UF_DONT_EXPIRE_PASSWD flag is 0x10000

 $user.SetInfo()}

 # Create 30 administrator users named user1 ... user 30

for($i=20; $i -le 23; $i++){

  create-account("TRAIN-$i")

  }


DHCP Configuration, Single Scope Backup from windows server 2012r 2 to 2016

1. Export and Import DHCP Single Scope from one Server to another also overwrite the Scope


Open PowerShell with administrative privilege and run below command  

Export-DhcpServer -ComputerName "192.168.0.16" -File "C:\temp\dhcpexport1.xml" -ScopeId 192.168.1.0 –Leases

192.168.0.16 DHCP Server Name

192.168.1.0 Scope ID


Now move the dhcpexport1.xml file to destination machine

And run below command to import the Scope in another server.

Import-DhcpServer -ComputerName "192.168.0.16" -File "C:\temp\dhcpexport1.xml" -ScopeId 192.168.1.0 -Leases


Type 1 in BackupPath


To overwrite backup on existing scope run below command

Import-DhcpServer -ComputerName "192.168.0.16" -File "C:\temp\dhcpexport1.xml" -ScopeId 192.168.1.0 -Leases -ScopeOverwrite –Force


Featured Post

HPE MSA 2040 configuration step by step

HPE MSA 2040 configuration Default IP range for HP SAN storage MSA 2040 is 10.0.0.1/2 You need to connect your laptop and storage with...